Overview
We recommend that all users read the Quick-Start Guide for a thorough intro to the system.
Or if you just need a quick refresher, see the Core System Mechanics TL;DR.
For info about system architecture, data flow, and security model, see the Security & Compliance Architecture article.
This doc will cover:
Quick Intro to the System For Admins
System Architecture Overview
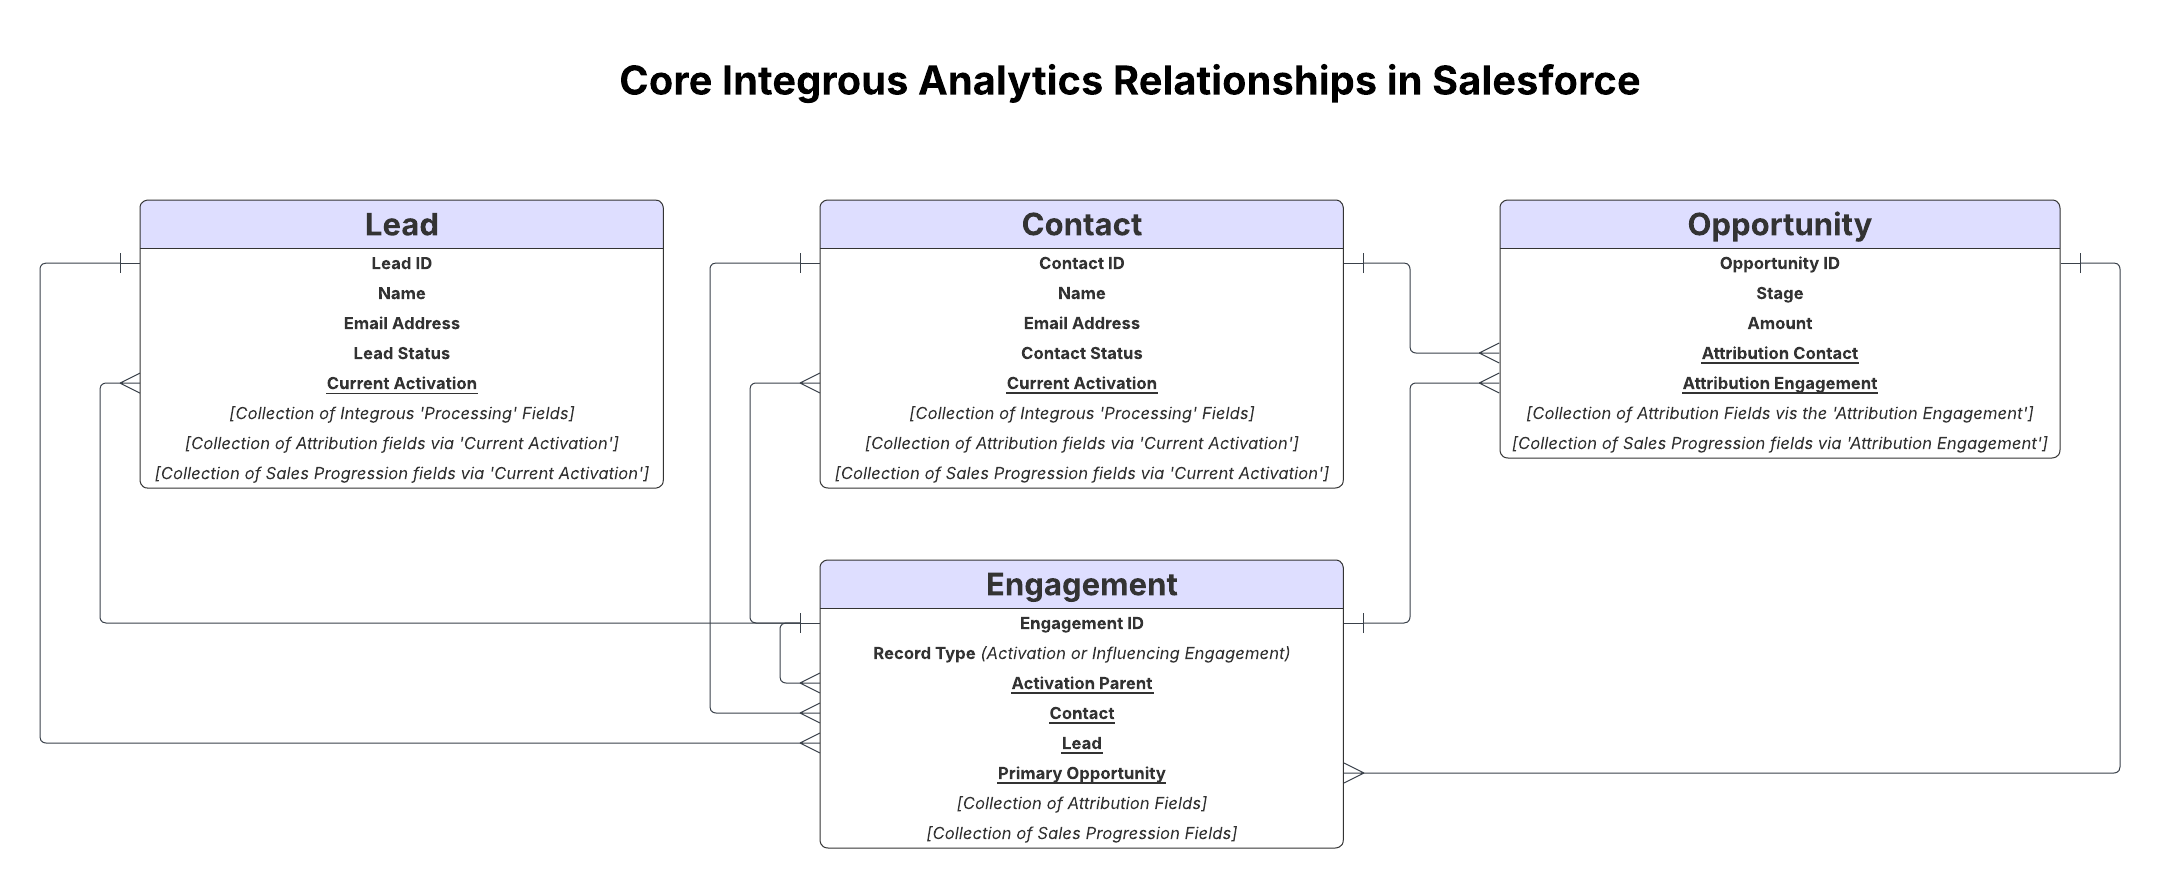
The diagram above illustrates some of the key relationships between our core custom object and some of the standard objects.
For more information, see the Engagement Object Relationships section of the Quick-Start Guide.
System Components Overview
The Integrous Analytics package interacts with standard Salesforce objects and introduces several custom components:
Standard Object Enhancements
Leads, Contacts, and Opportunities: Enhanced with Attribution Info and Sales Journey fields and trigger the creation of Engagements
Opportunity Contact Roles: Trigger the creation of Engagements in some cases
Campaign: Custom fields for Engagement record generation
Campaign Members: Trigger the creation of Engagements when configured
Task: Configurable criteria for Engagement record generation
Custom Components
Integrous Analytics App: Centralized location for accessing Admin Console, dashboards, and related object tabs
Admin Console: Configuration hub for Integrous Analytics in Salesforce
Engagement Object: Core object storing attribution and sales progression data
System Logs: Records of system operations for monitoring and troubleshooting
Reports & Dashboards: Pre-built analytics for attribution and funnel performance
Field Categories
There are many important fields in the system. Here are a few of the key categories of fields:
Attribution Info: Fields displaying cleaned attribution data
Sales Journey: Fields capturing funnel progression milestones
Processing Fields: Fields on Leads and Contacts for temporarily holding Engagement info as Engagements are created
Raw Fields: Fields for holding uncleaned underlying data; used for setting attribution information and troubleshooting, but not in reporting. Inform the values in the ‘Reporting’ fields.
Reporting Fields: Attribution fields used in reporting, derived from Raw fields, used in reporting
More info: Processing, RAW, and Reporting Fields
Package Installation
Salesforce Edition Compatibility
Integrous Analytics is designed to integrate seamlessly with Salesforce Sales Cloud and is compatible with the following Salesforce Editions:
Salesforce Enterprise Edition
Salesforce Unlimited Edition
Salesforce Developer Edition
Prerequisites for Administrators
Before installing and configuring the package, ensure you have:
Salesforce Administrator Knowledge: Familiarity with Salesforce administration concepts including object relationships, custom fields, record pages, and permission sets.
Flow and Automation Expertise (Optional): While not required, experience with Salesforce Flow or other automation tools will be helpful for extending functionality.
Pre-Installation Steps
Complete these steps before beginning the installation:
Verify that Campaigns are enabled in your Salesforce organization
Assign the Marketing User permission to all users who will manage campaigns
Confirm that relevant user profiles have permission to edit Campaigns
Ensure Opportunity Contact Roles are enabled and properly configured
Installation Process
Log into your target Salesforce environment
Paste the installation link provided by Integrous Analytics after the '.com/' portion of your Salesforce URL
On the installation page, select "Install for Admins Only"
Check the box to authorize the installation
Click "Install"

On the next page, select “Yes, grant access to these third-party web sites” checkbox, then click “Continue”
Note: This checkbox enables license provision by Integrous Analytics, as well as the data mapping functionality (for more info, see the Data Mapping Module article)

Installation typically takes several minutes. You'll receive an email notification once it's complete.
Permission Assignment
The package includes two pre-configured permission sets:
Integrous Admin
Provides complete access to all system functionality and configuration settings
Includes access to raw attribution data
Enables management of Sales Journey configuration, campaign settings, and feature activation
Controls log retention and license retrieval capabilities
Integrous User
Provides access to cleaned and formatted attribution data for reporting
Restricts access to configuration settings and raw data
Appropriate for end users who need to view and analyze attribution data
We recommend applying the Integrous User Permission Set to all internal Users. For instructions on applying this to current Users and automatically to all future Users, see Granting ‘Read’ Access to All Salesforce Users.
❗Important:
Assign administrators both permission sets to ensure complete access to all functionality.
License Activation
After installation and permission assignment, activate your license:
Log in as an administrator (with Integrous Admin permission set)
Open the App Launcher and locate the "Integrous Analytics" app
Navigate to the "Integrous Admin Settings" tab
In the License Management section, click "Refresh License Status"
The page will reload, displaying all configuration settings and a success message

If you encounter any issues activating your license, contact Integrous Analytics support.
Record Page Customization
The package includes pre-configured Lightning Record Pages accessible through the Integrous Analytics app. If you are using Lightning Record Pages, you can incorporate additional components into your existing pages for standard objects like Leads, Contacts, and Opportunities.
Lead/Contact Record Pages
💡 Pro-Tip
To save implementation time, we recommend reading through this section before beginning configuration. If you’d like to add both fields from related Engagements AND related lists of Engagements, you can do these together in the same set of Lightning Record Page edits.
Adding Attribution Quick Actions
❗Highly recommended step
We strongly recommend adding useful attribution and sales progression info to Leads and Contacts via their relationship to their most recent Activation Engagement record. We additionally recommend removing any legacy fields that contain similar information to avoid confusion and ensure everyone is aligned around the new system.
To add this attribution and sales progression info to Leads and Contacts:
Navigate to the Lead or Contact object in Setup
Click ‘Lightning Record Pages’ > Edit your desired page
Drag & drop a Related Record component to the page

Configure the component:
For Update Action, select "Attribution Info"
Set Header Label to "Attribution Info"

Add a second Related Record component:
For Update Action, select "Sales Journey"
Set Header Label to "Sales Journey"
Save changes to the Lightning record page
Note: If you’re configuring a Lightning page for Marketing Admins, you can also expose uncleaned (raw) UTM data gathered for Contact or Lead. To do that, repeat steps 1-5 and select ‘UTM Tags’ action for step ‘4’, name the component ‘UTM Tags’.
Adding Related Lists
❗Highly recommended step
We additionally strongly recommend adding related lists of Engagements to Lead and Contact pages. This provides a critical history of Lead/Contact interactions.
To add Engagement Related Lists:
Navigate to the Lead or Contact object in Setup
Click Page Layouts > select the layout to modify
Click "Related Lists" at the top left
Drag "Engagements" to the Related Lists section
Save the layout
Click Lightning Record Pages > Edit your desired page
Add Dynamic Related List components:
Configure one for "All Engagements"
Configure another for "Activation Engagements"
Save changes to the Lightning record page
Opportunity Record Page
❗Highly recommended step
We strongly recommend adding useful attribution and sales progression info to Opportunity pages via their ‘Attribution Engagement’ relationship.
To add this attribution and sales progression info to Opportunities:
Navigate to the Opportunity object in Setup
Click Lightning Record Pages > Edit your desired page
Add Related Record components:
One for "Attribution Info"
One for "Sales Journey"
Save changes to the Lightning record page
Campaign Record Page
The Integrous Analytics system provides the ability to create Engagement records from Salesforce Campaigns. See the related help article for more information: Creating Engagements From Campaigns
In order to use this feature:
Navigate to the Campaign object in Setup
Click Lightning Record Pages > Edit your desired page
Add a Related Record component:
For Update Action, select "Engagement Info"
Set Header Label to "Engagement Info"
Add component visibility filtering:
Scroll to Set Component Visibility section
Click Add Filter > Advanced
Select Permissions > Custom Permissions
Choose "ViewAllEngagementFields"
Save changes to the Lightning record page
Note: The Campaign quick action is only available to users with ‘Integrous Admin’ permission set assigned.
Picklist Configuration
The Integrous System allows creating Engagements from Campaigns and Tasks. To use these features, two picklists need to be configured to ensure consistent data capture for easier reporting.
❗Important
Ensure that the values set in Engagement Medium and Engagement Type conform to your organization’s UTM Taxonomy.
Campaign Picklists
Before configuring Campaigns to create Engagements:
Navigate to Setup → Object Manager → Campaign
Click Fields & Relationships → Engagement Medium
Scroll down to the Values section and click New
Add necessary picklist values for your organization
Click Save
Repeat these steps for the Engagement Type field.
More info: Creating Engagements from Campaigns
Task Config
Before configuring Tasks to create Engagements:
Navigate to Setup → Object Manager → Sales Activity Config
Click Fields & Relationships → Engagement Medium
Scroll down to the Values section and click New
Add necessary picklist values for your organization
Click Save
Repeat these steps for the Engagement Type field.
More info: Creating Engagements from Tasks
Field Label Customization
Sales progression is one of the core types of information captured in the Integrous Analytics system, enabling reporting on funnel milestones such as lead routed/working, opportunity/pipeline creation, and win (more info). These milestones are tracked using date and owner fields.
Our system uses generic sales stage names by default; however, some customers prefer to use their internal terminology.
For example, you might prefer:
Default Label | Custom Label Examples |
|---|---|
Stage 1 Date | Activation Date |
Stage 2 Date | MQL Date |
Stage 3 Date | SAL Date |
While these can’t be edited directly, you can override them using Salesforce’s Translation Workbench.
This allows you to customize how field names appear on records and in reporting (e.g., change Stage 2 Date to MQL Date), though it does not change the underlying field API names.
Note: This is an optional customization and does not affect how the system processes data or tracks sales stages. It only changes how field names appear to users.
To learn more, see the Customizing Field Labels article for step-by-step instructions.